Tuesday, May 8, 2012

Garden Center Tour/Inspiration

I have recently realized that it is impossible for me to go anywhere or look at anything just for fun.   I think Wonder Hubby wishes I would sit quietly in a closet without contact with the outside world, otherwise I am constantly coming up with projects and they usually involve him in one way or the other!   Recently Mini, The Nana and I took a Sunday afternoon window shopping trip.   We were headed to a local garden center but Mini knew I could spend the whole day there so she talked me into heading there last.

We started with home decor.  I was so proud of the fact that I saw these adorable little frames (perfect for my Coastal bedroom I blogged about here) but I didn't buy them.  I mean why buy them when you have all the stuff at home to make them :)  So, we were off  I was already coming up with projects.


We also stopped into DSW (this place is a very dangerous place, I love it but Mini can't seem to leave the place without buying 3-6 pairs of shoes, she doesn't like to shop don't ya know).  I saw these first....


I love some polka dots but I think I like the red heel just as much!

but, I didn't buy them.

Then I saw these...


Awww....You had me at Bow.

but, I didn't buy them.

Then I saw these...

I can hardly pass up a floral heel....sigh.


but, I didn't buy them.  What I did was I flee the place fast because I just couldn't stand this not buying thing. 

Finally we headed off to Moore and Moore Garden Center.  They are located in west Nashville and are a treasure trove of goodies.


I love the country look of the building with its big front porch.  It just says come, stay, fall in love with everything.


After seeing this blue stand with red geraniums, I will be on the lookout for old stands to paint.


Love the plant stand on the left....I could so fill this up with herbs.


I think I am going to have to have a terrerium soon, they are just too cute.


We visited just before Easter so we were able to enjoy all their sweet Easter decor.  I adore the table in the picture above.  I could use this so many places!


Lots and lots of pots.


I need this as the new chandy in my hut!


This is precious!  When Miss Mara's playhouse changes over to my garden cottage soon, I want something unique like this for the front door.


Hmmm....can I make a variation of this?  I think I can!  I can just see it all covered in ivy.


These sweet little frogs would be so cute on the pots around my pond.


Love the blues!  Okay, to be honest I haven't met a pot of any color that I didn't like.  I could have spent all day taking pictures of all the pots color collections they have.


Oh by the way they have plants too!  Finally, I managed to get around to looking at them.  They have a wonderful selection.  I loved the unique geranium colors they had.


Their herb collection was awesome.


There was so, so much more.  I was just so giddy the whole time that I missed taking photos of so many things because I just couldn't control myself! Sorry :(  The good news is I am headed back this week and I am willing to bet there will be much more to share with you later.

 One item I did see and yet failed to photograph was a tool caddy used as a planter.  It was very aged looking and I fell in love.  Of course I wondered immediately if I could make this.   I just happened to have some cedar scattered in the side yard from where we are in process of cleaning out the wooded area behind Mini's playhouse.  It was headed for the burn pile but I kept setting it aside because I just knew I would need it for something.  Within days I had visited the garden center and had my inspiration for the cedar, I would build the tool caddy.


Now when I said I, I really meant it.  Many times I say I and I really mean Wonder Hubby and I, but I was determined that I could actually handle building this!  I would build lots of goodies but there is that whole tape measure reading issue. I have got to attend a class on that or something because being tape measure illiterate is really holding me back.


Wonder Hubby was pretty patient about it and didn't do the usual and just take the project away and finish it thing!


This part I can handle....love the mitre saw!  I only made a couple of bad cuts :)


I don't mind using the drill press either, although I was a little freaked out when the wood started to smoke.  I've never had that happen before, guess it was the cedar.

Then things went south.  I do not excel in the nailing things together department, so Wonder Hubby had to assist with this part.  Thankfully he didn't take over and he had tons of patience.


I love the aged look of it.  I did have to do some interesting painting to get the dowell handle to match the old aged cedar. 


I added it to my freshly planted back bed....so when this fills in a bit the caddy will be surrounded by impatients...I think I did okay for my first building project.

The good news is....Wonder Hubby decided to purchase a set of 5 air nailers!  I learned to use these last week on porch rails and I love them.  As a matter of fact, I just thought of another project I could use them for :)

Thanks for stopping by.  If you are in the Nashville area make sure to drop by Moore and Moore Garden Center and spend a little time drooling.

Monday, May 7, 2012

Spots and Dots Glasses

Hi all!  I received some emails inquiring on my health and welfare so I decided I better put the word out that although I have been doing so much physical outdoor work and sometimes feel like I died, I am very much alive!  I have missed blog land but I started so many projects I haven't even had time to read blogs and catch up much less write myself.  Hopefully, I am winding up some of those and we were finally blessed with a little rain this morning so I have a bit of indoors time and wanted to post a project I did a few weeks ago, I hope you enjoy.

 I have been working on a new spring/summer table scape for dining in The Hut (FYI, I will be doing a post on The Hut soon for those of you that wonder what in the word I am blabbering about).  As I was kicking around ideas for this table I realized I needed some new glasses that would help tie it all together.  Fine, I didn't need them but I wanted them :) 

Since I have been on a painting kick as of late,  I decided to paint them to coordinate with some placemats that I just love and we the foundation of the tablecape.   So I made a  trip to my local dollar store and picked up these glasses (whoops, I just realized I don't have a pic of the glasses before I got busy on them so you will have to use your imagination here).  I love unwrapping so it was awesome having them bagged (I know, I knew what was inside but I still was excited!).

After I had them home and cleaned with alcohol, I drug out the paints I used on my trivet project back at Christmas.  I love this paint!  After trying out different types of paint on glass products, I think this one is the easiest to use and provides the best coverage.

Okay, here we go.  I used painters tape to give me a guideline because as anyone that knows me will tell you, I don't see straight.  I used the end of a paint brush for my dots but you can use the tool of your choice.  A line of yellow dots first.


  A line of yellow dots first.


I added "petals" with dots of different colors....and then more dots to fill in.


After I kept adding and adding (I don't ever seem to find a good stopping spot so Mini decided when enough was enough) it was off to the oven to bake.  I put them in a cold oven to bake at 300 degrees for 25 minutes.  Please, please, please do not touch them or move them until they are completely cool, trust me I learned this the hard way long ago!


All finished.  I think they are going to look great on the new tablescape. 


Until then they are hanging out in my Fiesta Ware china cabinet and they look adorable!


Thanks for stopping by for a visit.  I hope everyone has a great Monday and a wonderful week!  I am joining Susan at Between Naps on the Porch for Met Monday and Kim at Savy Southern Style for Wow Us Wednesdays.


Thursday, April 5, 2012

Pretty in Pastel and Peep Fiesta Easter Tablescape and Tutorial

I have been playing landscaper so much lately that I completely blew off completing my Easter tables.  Finally today, with Mini's help I put a couple together that I wanted to share with you.  The Peep Fiesta Easter Table includes the creation of Peep napkin rings.
So let's hop to it!

First stop, my dining room tablescape that I call Pretty in Pastels.  You need to know that my tablescapes are not perfect or fancy but are usually filled with things of sentimental value as is this one.

My table is covered in a cream damask cloth and topped with a pastel green polka dot topper.
I don't have any Easter specific dishes so my trusty clear plates are put into service.  I kind of have a thing for glass and crystal but I can never seem to photograph it to look as pretty as it does in person! lol  I am using my vintage glasses that Wonder Hubby has given me the last two Christmases (he is so good about finding great antique goodies).


The Easter tree has been around since the kids were small, eh hmmm....like 15 plus years.  The decorations on it have been around that long too and that explains the odd collection of ornaments.


The tea set was a gift from my dad several years ago. I just love the sweet bunnies on top.  The colors and detail are just beautiful.


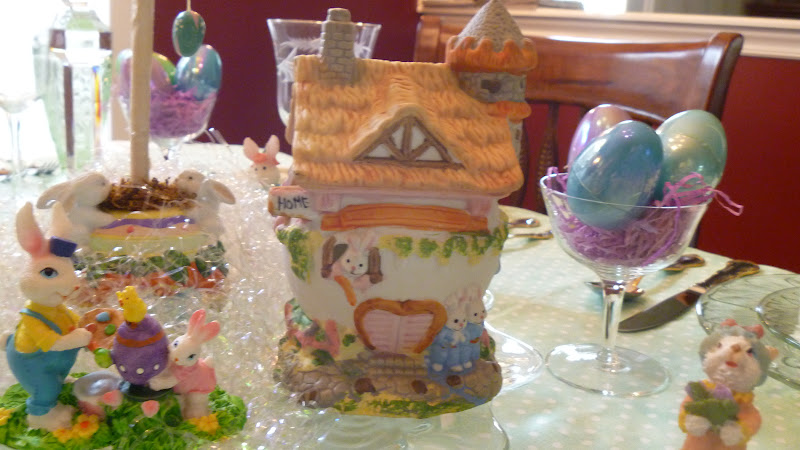
The bunny house and figurines and the crystal bells were all gifts from The Nana.  They have collected these over the years.  They bring back such good memories each year when I unpack them.


I love my bunny napkin rings. I have had them for years and only have 4 :(   Wish I had purchased 6 or 8 back them.


All the empty space will be filled with Easter dinner.  Ham or Turkey is yet to be determined.  Either way we will eat to much and be blessed with family at the Easter table.

Before we head off to the breakfast room Peep Fiesta tablescape I want to share a project.  I have been searching for napkin rings to use with my Fiesta ware for Easter all season.   I just couldn't seem to find just the right ones.  Recently The Nana, Mini and I enjoyed a Sunday shopping stroll and I found these adorable little chicks.


I then stopped into a Dollar Tree to score some of their napkin rings to use with the chicks.  Guess what?   They didn't have them, drats.  So I tried another store, guess what?  They too were out (or no longer carry them, I am not sure which).  So now I needed something to use as a napkin ring and it had to be cheap.   I found this PVC pipe in the garage (free, yea) and decided it would be perfect.


I cut a test piece, then conned Wonder Hubby into cutting the rest (I don't mind cutting wood with the miter saw but cutting plastic freaks me out a bit).

Since this needed to be a super cheap project after I sanded them a bit I covered each of them in ribbon.


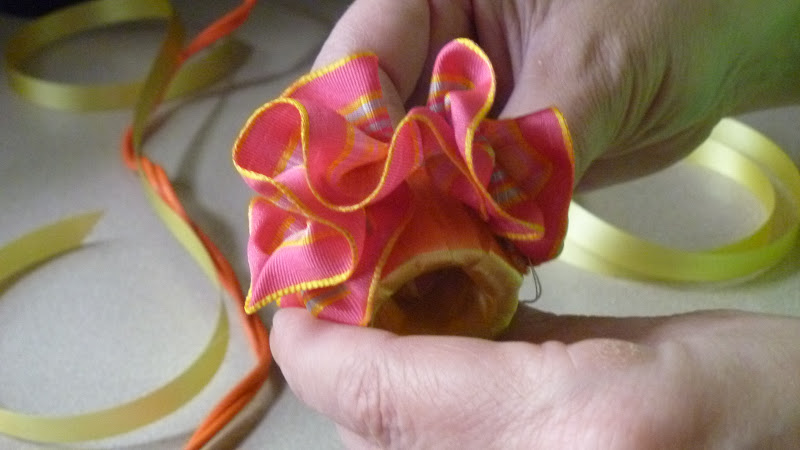
Then I wanted to spiff them up a bit, so I added more ribbon (everything is better the more ribbon you add).  I gathered with a long running stitch and then using the trusty (and yet oh so pain inflicting) glue gun glued the ribbon to the "ring." 


Then the crowning (or in this case crowing or more accurately the chirping) touch....the peep.


I am so happy with the way they turned out and they are adorable in my Fiesta table, lets take a peek.


Of course this table features our Fiesta Ware.  The basket is one of the kids from years gone by....I love the chenille ribbon in the weave.


The Easter house and church are also from The Nana.


Love my little Peep rings!


I love all the happy colors.


We enjoyed dinner at this table tonight....and it works....everyone was happy!  Happy Easter to all, may you enjoy a blessed weekend.